

前回の続きで、WebAPIが色々と便利なので、Reactで使ってみる。
使う際に、Laravelが中間に入るとセキュリティも保たれて便利です。
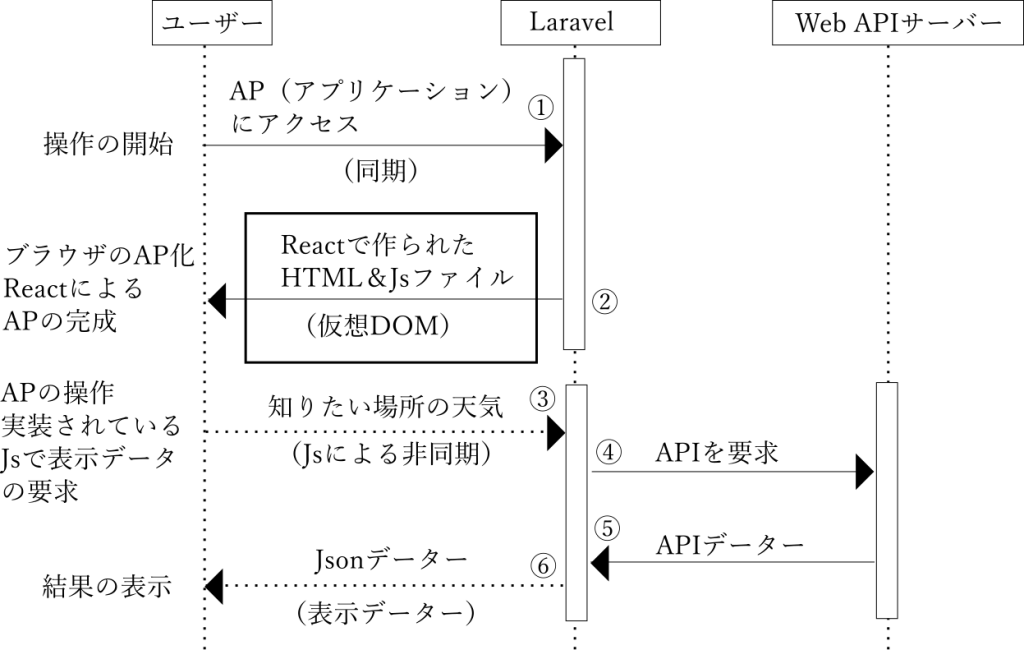
まずは、シーケンス図です。
アプリケーションサーバーとしてLaravelを置き、データー処理を行います。
数字の順番にコードを記述するのですが、かなりややこしいです。
なぜなら、サーバーアプリケーションをLaravel(PHP)で記述して、ブラウザ側はReactで
記述しなければなりません。Laravelはフレームワークなので、Reactを取り込んだ開発が
可能なので、PHPでプロジェクトのコードを記述し、ブラウザに渡すコードはReact(Javascript)
で作成できます。つまり、MVCで表現すると、PHPでデータの処理(Model、Controller)
を記述して、表示(View)でReactを使う事になります。
これを簡単にまとめると、
”ブラウザー上で動作するアプリケーションソフトをReactで作り、
そのデーターをLarvelで処理する。”
となります。上記のシーケンス図では、ユーザーが2回データーを受け取りますが、
1回目(②)でブラウザーをアプリケーション化して、2回目(⑥)はアプリケーション
の実行結果となります。
シーケンス図① アプリケーションにアクセス
ブラウザーからのリクエストに対してのLaravelの処理は、ルート処理で始まる。なので、
プロジェクトルート/routes/web.phpに
Route::get('/', function () {
    return view('welcome');
});
を記述する。最初のアクセスなので、welcome画面を用意しておきます。
プロジェクトルート/resources/views/welcome.blade.php
に処理が移るので、表示内容(View)を記述します。
シーケンス図② Reactで作られたHTML&Jsファイルの作成
welcome.blade.phpの中身は、
<!DOCTYPE html>
<html lang="{{ str_replace('_', '-', app()->getLocale()) }}">

<head>
    <meta charset="utf-8" />
    <meta name="viewport" content="width=device-width, initial-scale=1" />
    <title>Laravel Vite React</title>
    @viteReactRefresh @vite(['resources/css/app.css','resources/js/index.tsx'])
</head>

<body>
    <div id="app"></div>
</body>

</html>
かなりシンプルな内容で、bodyタグ内でid=”app”が記述されたdivタグのみで、このタグ内に
コンパイルにより、HTMLが追加されていきます。また、そこで追加されたHTMLコードを
Javascriptで操作する事で、アプリケーションをつくり上げていきす。
なので、コンパイルするコードをReactで記述します。
ReactはJavascriptを作り出すので、
プロジェクトルート/resources/jsのフォルダ内にindex.tsxを作ります。
この設定はVite.config.tsのinputで指定します。
index.tsxは
import React from 'react';
import { createRoot } from 'react-dom/client';
import App from './App';
import.meta.glob([
  '../images/**',
]);

const element = document.getElementById('app')
const root = createRoot(document.getElementById('app')!);
root.render(
  <React.StrictMode>
    <App {...element?.dataset} />
  </React.StrictMode>
);
上記のコードの
<App {…element?.dataset} />
でReactの自作コンポーネントをid=appを設定したタグに展開させます。
import App from ‘./App’;でApp.tsxを読み込んでますので、同じ階層にファイルを作ります。
App.tsx
import React, { Component } from 'react'
import { useState } from 'react';
import Title from "./components/Title";
import Form from "./components/Form";
import Results from "./components/Results";
import Loading from "./components/Loading";

type ResultsStateType = {
    country: string;
    cityName: string;
    temperature: string;
    conditionText: string;
    roadnameText: string;
    icon: string;
}
function App() {
    const [loading, setLoading] = useState<boolean>(false);
    const [city, setCity] = useState<string>("");
    const [results, setResults] = useState<ResultsStateType>({
        country: "",
        cityName: "",
        temperature: "",
        conditionText: "",
        roadnameText: "",
        icon: ""
    });
    const getWeather = (e: React.FormEvent<HTMLFormElement>) => {
        e.preventDefault();
        setLoading(true);
        fetch(`http://lampass.online/lampass/api/${city}`)
            .then(res => res.json())
            .then(data => {
                setResults({
                    country: data.location.country,
                    cityName: data.location.name,
                    temperature: data.current.temp_c,
                    conditionText: data.current.condition.text,
                    roadnameText: data.Feature.Geometry.Coordinates,
                    icon: data.current.condition.icon
                });
                setCity("");
                setLoading(false);
            })
            .catch(err => alert("もう一度リトライしてください。"))
    }
    return (
        <div className="wrapper">
            <div className="container">
                <Form getWeather={getWeather} setCity={setCity} city={city} />
                {loading ? <Loading /> : <Results results={results} />}
            </div>
        </div>
    );
}

export default App;
ファイルの拡張子がtsxなので、typescripteを使っているのが解ると思います。
この時点で、
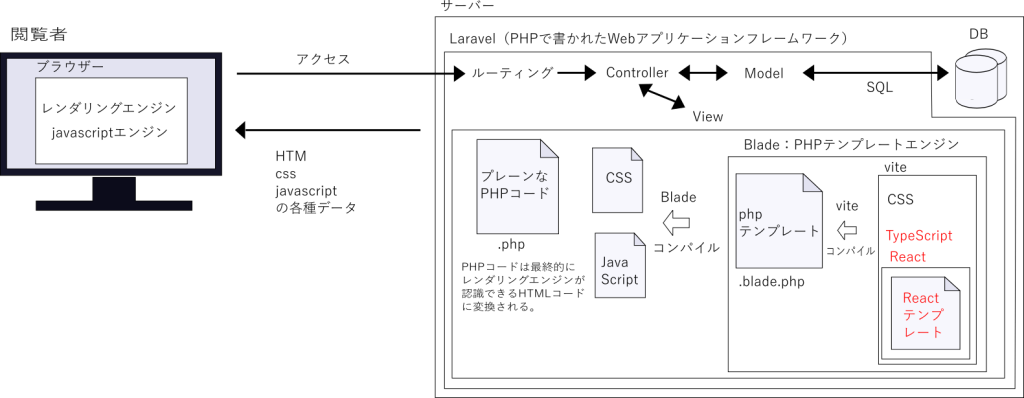
PHPのテンプレートエンジンであるBladeファイルに対し、Vite&TypeScriptを組み込んだ、React
テンプレートファイルに、コードを書きこむと言う、呪文のような長い流れになります。
App.tsxファイルのreturn以降の仮想DOM作成部でコンポーネントが3つ使われています。
<Form/>:入力フォーム シーケンス図②での表示
<Loading/>:データ待ち状態 シーケンス図③~⑤での表示
<Results/>:結果表示 シーケンス図⑥での表示
となります。
ここでは、まだ表示もされない<Loading/><Results/>の2個のコンポーネントも同時に
作っておくことになります。
シーケンス図②ではまだ、入力フォームのみの表示なので、
Form.tsx
import React, { Component } from 'react'

type FormPropsType = {
    city: string;
    setCity: React.Dispatch<React.SetStateAction<string>>;
    getWeather: (e: React.FormEvent<HTMLFormElement>) => void;
}
const Form = ({ city, setCity, getWeather }: FormPropsType) => {
    return (
        <form onSubmit={getWeather}>
            <input type="text" name="city" placeholder="都市名" onChange={e =>
              setCity(e.target.value)} value={city} />
            <button type="submit">Get Weather</button>
        </form>
    );
};

export default Form;
を表示させる事になります。
中身は、都市名(アルファベット)を入力させて、ボタンを押させる処理を記述しています。
データーが揃って無ければ表示しない処理として、<Results/>を作成します。
Results.tsx
import React, { Component } from 'react'
type ResultsPropsType = {
    results: {
        country: string;
        cityName: string;
        temperature: string;
        conditionText: string;
        roadnameText: string;
        icon: string;
    }
}

const Results = ({ results }: ResultsPropsType) => {
    const { country, cityName, temperature, conditionText, roadnameText, icon } = results;
    let LatitudeAndLongitude = roadnameText.split(',');
    console.log(LatitudeAndLongitude);
    return (
        <>
            {country &&
                <div className="results-country">{country}</div>
            }
            {cityName &&
                <div className="results-city">{cityName}</div>
            }
            {temperature &&
                <div className="results-temp">{temperature} <span>°C</span></div>
            }
            {roadnameText &&
                <div>
                    <div className="results-temp"> <span>緯度: </span>
             {LatitudeAndLongitude[1]}</div>
                    <div className="results-temp"> <span>経度: </span>
             {LatitudeAndLongitude[0]}</div>
                </div>
            }
            {conditionText &&
                <div className="results-condition">
                    <img src={icon} alt="icon" />
                    <span>{conditionText}</span>
                </div>
            }
        </>
    );
};

export default Results;
&&を使い、データの存在時のみタグを表示する処理とします。
ここまでで、
ブラウザーで動作するアプリケーションソフトを作成した事になります。
次に、このアプリケーションソフトが行う、処理を記述していきます。
ブラウザー側では、データーの入力と結果の表示のみを非同期で行い、
API通信はLaravelで行う事とします。
まずはroutes処理、
プロジェクトルート/routes/web.phpに
Route::get('/lampass/api/{city}', [\App\Http\Controllers\Lampass\IndexController::class, 'macroApi']);を追加し、URLに
ドメイン/lampass/api/入力都市名
の記述をする事で、HTTPリクエストのget()で{city}を受け取ります。
受け取ったcityでAPI通信を行います。laravelはGuzzle(HTTPクライアント)を標準実装して
ますので、通信相手のURLがわかれば、通信は簡単です。
routesにより、IndexControllerクラスのメソッドmacroApiに引数cityを持って処理が移ります。
シーケンス図④⑤⑥ API通信
プロジェクトルート/app/Http/Controllers/Lampass/IndexController.phpに記載された
IndexControllerクラスにメソッドmacroApiを追加する。
Laraveの基本ルールとして、1ファイルに記載するクラスは1つで、
ファイル名とクラス名は揃える事になっています。なので、IndexController.phpファイルに
記載されるクラスは、IndexControllerクラスのみです。
public function macroApi($city)
    {
        $url_Yahoo = "https://map.yahooapis.jp/"
            . "/geocode/cont/V1/contentsGeoCoder?"
            . "appid=" . config('services.yahooyolp.key')
            . "&query={$city}"
            . "&category=address";
        $url = config('services.weather.url')
            . "v1/current.json?"
            . "key=" . config('services.weather.key')
            . "&q={$city}"
            . "&aqi=no";
        $responses = Http::pool(fn (Pool $pool) => [
            $pool->as('first')->get($url),
            $pool->as('second')->get($url_Yahoo),
        ]);
        $responses1 = json_decode($responses['first'], true);
        $obj = simplexml_load_string($responses['second']);
        $json = json_encode($obj, JSON_PRETTY_PRINT | JSON_UNESCAPED_UNICODE);
        $responses2 = json_decode($json, true);
        $fruits_merge = array_merge($responses1, $responses2);
        // 結合データをJSON文字列にエンコード
        $combinedJson = json_encode($fruits_merge, JSON_PRETTY_PRINT);
        return $combinedJson;
    }
上記の記述で、シーケンス図④⑤⑥が行われます。
内容は簡単で、APIのURLと必要なIDを連結して、HTTPクライアントのgetで送信してあげれば、
必要なレスポンスが戻ってきます。これの必要な部分を抜き出して、Json形式でつなげて
あげれば返信データの完成です。IDは個人情報なので、各自のを設定してみて下さい。
もう一つ、returnでオブジェクトの指定だけで、JSONデータが送信されますが、
Laravelの場合、Controllerクラスでのreturnに配列やオブジェクトなどを設定すると、
Header に application/jsonを勝手に追加してくれます。なので、アプリぇーションにAPI
としての機能を簡単に実装できます。